Ricordate i punti posteriori all'uncinetto - maglie alte, basse e bassissime -
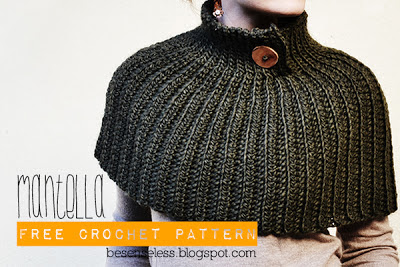
usate per i cappelli? La tecnica è la stessa anche per la mantella! Ideale da indossare sul cappotto o da sola nelle prime giornate tiepide.
Scroll down for english text!
Questa mantella non si lavora in circolare ma in righe di andata e ritorno. Si realizza un rettangolo e si chiude con una cucitura lungo la schiena (dal collo verso la schiena) da eseguire con l’uncinetto a maglia bassissima o con un ago da lana.
In questo modo sarà semplicissimo realizzare una mantella con la circonferenza giusta o scegliere la taglia in base all’utilizzo: sopra il cappotto per l’inverno o più piccola per la primavera da indossare su una camicia o una maglietta.
Punti e abbreviazioni:- catenella (cat)
- maglia bassissima posteriore (mbss.p)
- maglia bassa posteriore (mb.p)
- mezza maglia alta posteriore (mma.p)
I punti “posteriori” si eseguono con la stessa tecnica dei punti base lavorando però solo l’asola posteriore del punto. Nel gergo internazionale questi punti si chiamano “in back loop”. Permettono di ottenere una lavorazione a coste elastica e morbida.
Campione e materiali: Utilizzare un uncinetto n.6/J e lana medio/grossa
Per una taglia media occorreranno circa 250g / 500m di filato
Per ottenere un quadrato di 10cm di lato occorre lavorare 7 giri di mma.p su 11 catenelle di base.
Importante!!! Eseguire tutti i punti morbidamente, con una tensione leggera del filo, soprattutto nella lavorazione della maglia bassissima posteriore.
Schema:giro 1. Avviare 43 catenelle. Saltare la prima cat., 12 mbss.p, 5 mb.p, 25 mma.p, due cat. girare il lavoro.
giro 2. 25 mma.p, 5 mb.p, 12 mbss.p, una cat, girare il lavoro.
giro 3. 12 mbss.p, 5mb.p, 25 mma.p, due cat. girare il lavoro.
Ripetere il giro 2 e 3 fino al 72esimo. Si può continuare per ulteriori giri o terminare il lavoro prima del 72 in base al tipo di filato utilizzato e alla taglia della mantella che si desidera realizzare.
Per realizzare la mantella con bottone e asola sul collo: ripetere secondo e terzo giro fino alla 37esimo.
giro 38: 25 mma.p, 5 mb.p, 13 cat, girare il lavoro. Continuare con il giro 3 partendo dalla seconda cat dall’uncinetto. Proseguire con il giro 2 e 3 fino al 72esimo.
Per realizzare l’asola: riprendere il lavoro dalla maglie bassissime del giro 38. Lavorare 12 mbss.p per 4 giri, 1 cat, girare il lavoro, 4 mbss.p, 4 cat, saltare 4 maglie e lavorare altre 4 mbss.p. Continuare per altri 4 giri con 12 mbss.p
Piegare il rettangolo facendo combaciare l’ultimo giro al primo. Lavorare un giro di maglie bassissime prendendo un’asola dell’ultimo giro e la parte inferiore della catenella iniziale. Aiutarsi, se necessario, con delle spille o con una leggera imbastitura. Per chiudere il lavoro senza l’uncinetto tagliare una lunga gugliata di filo e cucire con un ago da lana.
This cape is crochet in rows. Work a rectangle, close it with a side seam with crochet hook or a tapestry needle (from the neck to the back). So it will be easy to make a cape with the perfect circumference or choose the right size according to use: above the coat for winter or smaller, for spring, to wear over a shirt or T-shirt.
Stitches and abbreviations:
- chain (ch)
- slip stitch in back loop (slst.bl)
- single crochet in back loop (sc.bl)
- half double crochet in back loop (hdc.bl)
“Back loop” crochet stitches are a variation of basic stitches. Insert the hook only in the back cable of the chain and work the rest of the stitch normally.
Gauge & supplies:
Size 6mm/J crochet hook and 250g /500m of bulky wool (for medium size)
11 stitches and 7 rows worked in hdc.bl = 10 cm (3.9 in) square
Important!!! Keep your stitches loose without stretching too much the thread. Mostly for slip stitch in back loop.
Pattern:
row 1. Ch 43. Slst.bl in the second ch from the hook, 12 slst.bl, 5 sc.bl, 25hdc.bl, ch 2 and turn
row 2. 25 hdc.bl, 5 sc.bl, 12 slst.bl, ch, turn
row 3. 12 slst.bl, 5 sc.bl, 25 hdc.bl, ch 2, turn
Repeat second and third rows until row 72. It may continue for more rows or finish the cape before the 72 according to the type of yarn used and the size of the cape that you want to achieve.
To make the cape with button and buttonhole on neck: repeat the second and third round until the 37th.
row 38: 25 hdc.bl, 5 sc.bl, 13 ch, turn. Continue with row 3 starting from the second ch from hook. Repeat third and second rows until row 72.
Make the buttonhole (starting from slst.bl of row 38): 12 slst.bl for 4 rows, ch, turn. 4 slst.bl, 4 ch, skip 4 stitch, 4slst.bl. Continue for 4 rows with 12 slst.bl
Merge the latest row with the first one with crochet hook or tapestry needle.
Fold the rectangle by matching the last lap to the first. Work with slip stitches to sew together the two parts (work a loop of the stitches of the last row and the lower part of the foundation chain) and help, if necessary, with the pins. Or cut a long tail of thread and sew with a needle.
Segnalatemi eventuali errori o refusi: besenseless [at] yahoo.it
Grazie :)
pattern di airali handmade - besenseless.blogspot.com
non è consentito redistribuire, copiare o vendere neanche parzialmente i contenuti di questo post. per qualsiasi chiarimento scrivere a: besenseless[at]yahoo.it
Report errors: besenseless [at] yahoo.it
Thank you :)
pattern by airali handmade - besenseless.blogspot.com
not allowed to distribute, copy or sell even partially the contents of this post
for any questions feel free to contact me: besenseless[at]yahoo.it